The manufacturing industry is undergoing a massive transformation with the advent of 3D printing technology. Among the many applications of this technology, 3D printed molds have emerged as a game-changer for manufacturers.
With 3D printed molds services, manufacturers can now create custom molds quickly and cost-effectively, without the need for expensive and time-consuming traditional methods. In this article, we will explore the benefits of 3D printed molds and how they are revolutionizing the manufacturing industry.
What are 3D Printed Molds?
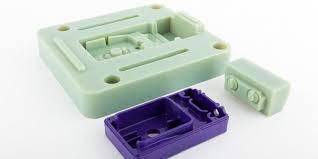
3D printed molds are molds that are created using 3D printing technology. These molds can be used to create a wide range of products, from small, intricate components to large and complex structures. Unlike traditional molds, which are typically made from metal or other rigid materials, 3D printed molds are made using a variety of materials, including plastics, resins, and even metals.
Process to Generate 3D printing moulds
The process of creating 3D printed molds with a 3D printer involves several steps. Here’s a complete guide on how to create 3D printed molds with a 3D printer:
Step 1: Design the Mold
The first step in creating 3D printed molds is designing the mold in CAD software. The design should include the cavity, core, and any necessary ejector pins or slides. The mold design should take into consideration the material being used, the part geometry, and any necessary cooling channels.
Step 2: Prepare the 3D Model for Printing
Once the mold design is complete, the next step is to prepare the 3D model for printing. This involves converting the CAD file into a format that can be read by the 3D printer. The model is also checked for errors or any potential issues that could arise during the 3D printing process.
Step 3: Select the Right Material
The choice of material for 3D printed molds depends on the specific application. Common materials used in 3D printed molds include thermoplastics, metals, and ceramics.
Step 4: Print the Mold
The actual 3D printing process involves using a 3D printer to print the mold layer by layer. The printer uses the selected material to build up the mold according to the CAD design. The printing process can take several hours or even days, depending on the complexity and size of the mold.
Step 5: Post-Processing
Once the mold has been 3D printed, it undergoes post-processing to prepare it for use. This can involve removing any support structures, sanding or polishing the mold surface, and checking for any defects or errors in the mold.
Step 6: Injection Molding
Once the mold is ready, it can be used for injection molding. This involves injecting molten material into the mold cavity to create the desired part. The mold is typically cooled using water channels before the part is ejected from the mold.
Advantages of 3D Printed Molds
- Cost-Effective
One of the biggest advantages of 3D printed molds is their cost-effectiveness. Traditional molds can be expensive to create, especially when they are custom-designed. 3D printed molds, on the other hand, are much cheaper to produce, since they don’t require the same amount of time and materials as traditional molds.
- Fast Turnaround Times
Another significant advantage of 3D printed molds is their fast turnaround times. Traditional molds can take weeks or even months to create, depending on their complexity. With 3D printed molds, manufacturers can create molds in a matter of hours or days, depending on the size and complexity of the mold.
- Customization
3D printed molds are highly customizable, allowing manufacturers to create molds that are tailored to their specific needs. This level of customization is not possible with traditional molds, which are often limited by the materials and techniques used to create them.
- Design Flexibility
With 3D printed molds, manufacturers have greater design flexibility, enabling them to create more intricate and complex molds than traditional methods allow. This is because 3D printing technology enables manufacturers to create molds with a high level of precision and accuracy, regardless of the mold’s complexity.
- Improved Performance
3D printed molds can also improve the performance of the manufacturing process. Since these molds are highly customizable, manufacturers can create molds that are optimized for their specific production needs, resulting in a more efficient and effective manufacturing process.
Applications of 3D Printed Molds
- Prototyping
3D printed molds are ideal for prototyping since they can be created quickly and cost-effectively. This allows manufacturers to test out new product designs before investing in expensive tooling and production processes.
- Small Batch Production
3D printed molds are also ideal for small batch production runs. Since these molds can be created quickly and cost-effectively, manufacturers can produce small quantities of products without having to invest in expensive tooling and production processes.
- Custom Products
3D printed molds are perfect for creating custom products, as they can be highly customized to meet specific design requirements. This is particularly useful in industries such as healthcare and aerospace, where custom products are often required.
The process of 3D printed injection mold tooling involves several steps.
Step 1: Designing the Mold Tooling
The first step in 3D printed injection mold tooling is designing the mold tooling using computer-aided design (CAD) software. The design process involves creating a 3D model of the mold tooling, including the cavity, core, and any necessary ejector pins or slides. The mold design should take into consideration the material being used, the part geometry, and any necessary cooling channels.
Step 2: Preparing for 3D Printing
Once the mold design is complete, the next step is to prepare the design file for 3D printing. This involves converting the CAD file into a format that can be read by the 3D printer. The mold design is also checked for errors or any potential issues that could arise during the 3D printing process.
Step 3: 3D Printing the Mold Tooling
The actual 3D printing process involves using a 3D printer to print the mold tooling layer by layer. The 3D printer uses a selected material, such as a thermoplastic, to build up the mold tooling according to the CAD design. The printing process can take several hours or even days, depending on the complexity and size of the mold.
Step 4: Post-Processing
Once the mold tooling has been 3D printed, it undergoes post-processing to prepare it for use. This can involve removing any support structures, sanding or polishing the mold surface, and checking for any defects or errors in the mold.
Step 5: Injection Molding
Once the mold tooling is ready, it can be used for injection molding. This involves injecting molten material into the mold cavity to create the desired part. The mold tooling is typically cooled using water channels before the part is ejected from the mold.
Tools Used in 3D Printed Molds
When it comes to 3D printed molds, there are a variety of tools that are used to ensure successful production. Let’s take a closer look at some of the essential tools used in 3D printed molds.
- 3D Printer: The 3D printer is the central tool used in the production of 3D printed molds. These printers use a range of materials, including thermoplastics, metals, and ceramics, to print the mold layer by layer, based on the 3D model designed in CAD software.
- CAD Software: Computer-aided design (CAD) software is essential for creating the 3D model of the mold tooling. This software allows designers to create a detailed digital representation of the mold that can be modified as needed before being sent to the 3D printer.
- Slicer Software: Slicer software is used to convert the 3D model into a format that can be read by the 3D printer. This software slices the digital model into layers, which the printer uses to build up the physical mold.
- Hand Tools: Various hand tools are used during post-processing to refine and prepare the mold for use. These tools include sandpaper, files, and polishing pads to remove any support structures and smooth out the mold surface.
- Cooling Systems: Cooling systems are essential in the production of 3D printed molds, as they help to regulate the temperature during the injection molding process. Water channels are often incorporated into the mold design to help cool the mold and improve the quality of the final part.
- Injection Molding Machines: Injection molding machines are used to inject molten material into the mold cavity, creating the final part. These machines are typically computer-controlled, allowing for precise and repeatable part production.
The tools used in 3D printed molds include 3D printers, CAD software, slicer software, hand tools, cooling systems, and injection molding machines. These tools are essential in ensuring successful and cost-effective production of high-quality parts using 3D printed molds.
Conclusion
3D printed molds are revolutionizing the manufacturing industry, providing manufacturers with cost-effective, fast, and highly customizable options for creating molds. With the ability to produce molds quickly and with greater design flexibility, 3D printed molds are opening up new opportunities for manufacturers across a range of industries.
From prototyping to small batch production runs and custom products, best 3D printing molding company can create excellent custom products more efficiently and cost-effectively.