Epoxy flooring has gained significant popularity in recent years, thanks to its robustness, adaptability, and visual charm. Whether you’re contemplating epoxy flooring for your garage, basement, industrial facility, or even a commercial establishment, having a grasp of the installation procedure is pivotal for achieving a smooth and enduring outcome.
Within this extensive manual, we will demystify the installation of epoxy flooring, dissecting it into digestible stages to guarantee the triumph of your project.
Step By Step Guide To Installing Epoxy Flooring
Step 1: Preparing the Surface
The first and arguably the most critical step in achieving a seamless epoxy flooring is surface preparation. No matter how skilled the installer is or how high-quality the epoxy products are, if the surface isn’t properly prepared, the epoxy won’t adhere correctly, leading to a subpar finish.
1.Surface Preparation: Initiate the process by eliminating any dirt dust debris and pre existing coatings from the floor. Achieve this by employing methods such as sweeping, vacuuming, and, if required, a pressure washer.
2. Degrease: For surfaces that may have oil or grease stains, use a degreaser or a suitable cleaner to ensure all contaminants are removed.
3. Repair Any Damage: Inspect the floor for cracks, holes, or other imperfections. Repair them using epoxy filler or patching compounds. It’s crucial to have a smooth and level surface for the epoxy to bond properly.
Step 2: Etching or Grinding
Once the surface is clean and free of defects the next step is too prepare it for epoxy adhesion. This can be done through two primary methods etching or grinding.
1. Etching: This involves applying an acid etching solution to the surface, which opens up the pores of the concrete. It’s essential to follow the manufacturer’s instructions carefully to ensure proper etching. Rinse thoroughly to remove any residual acid.
2. Grinding: Alternatively, some opt for mechanical surface preparation using a concrete grinder. This method is highly effective in removing any stubborn contaminants and creating a profile for better epoxy adhesion.
The choice between etching and grinding depends on the condition of your floor and personal preferences. Grinding is often preferred for heavily stained or uneven surfaces.
Step 3: Applying Primer
After the surface preparation is complete its time to apply a primer. The primer serves as a bonding agent between the concrete and the epoxy coating ensuring a strong and long lasting adhesion.
1. Mix the Primer. Follow the manufacturers instructions to mix the primer properly.
2. Apply the Primer: Use a roller or a brush to apply the primer evenly over the entire surface. Ensure that you cover all areas including corners and edges.
3. Let it Cure: Allow the primer to cure for the recommended time. This phase typically spans several hours, although it’s imperative to meticulously adhere to the precise instructions furnished by the manufacturer.
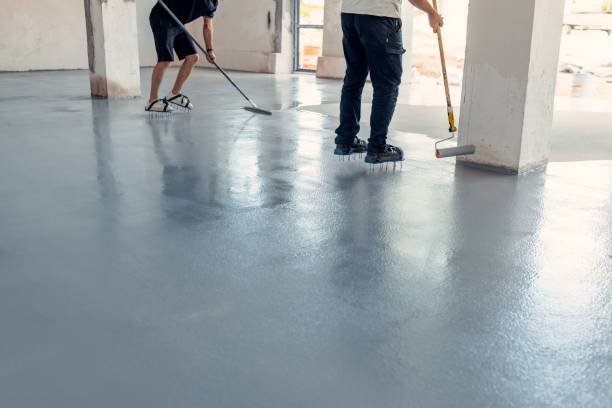
Step 4: Applying the Epoxy
With the primer successfully applied, you’re poised to administer the epoxy coating. Epoxy coatings are available in several variants, encompassing 100% solid epoxy, water-based epoxy, and epoxy with decorative flakes. The choice of epoxy type is contingent on the unique demands and preferences of your project.
1. Mix the Epoxy: Carefully mix the epoxy resin and hardener according to the manufacturer’s instructions. Proper mixing is essential to ensure the epoxy cures correctly.
2. Apply the Epoxy: Start by cutting in the edges and corners of the floor using a brush or roller. Then, use a roller with a long handle to apply the epoxy in even, overlapping strokes, working your way toward the exit to avoid trapping yourself in the space.
3. Add Decorative Elements (Optional): If you’re incorporating decorative flakes or other elements into your epoxy floor, this is the stage to do it. Sprinkle the flakes evenly onto the wet epoxy, ensuring they are spread uniformly.
4. Backroll (Optional): After applying the epoxy, some installers choose to backroll the floor with a roller to ensure an even distribution and to pop any air bubbles that may have formed.
5. Let it Cure: Allow the epoxy to cure according to the manufacturer’s guidelines. This can take anywhere from 12 to 24 hours or more, depending on the specific epoxy product and environmental conditions.
Step 5: Applying a Topcoat (Optional)
To enhance the durability and longevity of your epoxy floor, applying a topcoat is often recommended. The topcoat serves as a protective layer, safeguarding the epoxy from abrasion, chemicals, and UV rays.
1. Mix and Apply the Topcoat: Similar to the epoxy application, mix the topcoat according to the manufacturer’s instructions and apply it using a roller or brush.
2. Let it Cure: Allow the topcoat to cure as per the manufacturer’s recommendations. This usually takes less time than the epoxy base coat, typically around 8 to 12 hours.
Step 6: Final Inspections and Touch-Ups
Upon the complete curing of the epoxy and topcoat, it’s time for the final inspection. Thoroughly scrutinize the entire floor, paying close attention to any flaws, air bubbles, or uneven sections. Should you detect any problems, it’s imperative to rectify them at this stage. You can touch up any problem spots with epoxy or topcoat as needed.
Step 7: Cleaning and Maintenance
Congratulations, your epoxy flooring is now complete! To maintain its beauty and longevity, follow these cleaning and maintenance tips:
– Regular Cleaning: Sweep or vacuum the floor regularly to remove dirt and debris. For deeper cleaning, use a mild detergent and a soft mop.
– Avoid Harsh Chemicals: Avoid using harsh chemicals or abrasive cleaners that can damage the epoxy surface.
– Prevent Scratches: Place protective mats under heavy equipment or furniture to prevent scratches.
– Reapply Topcoat: Depending on the level of traffic your floor receives, you may need to reapply a topcoat every few years to maintain its durability and appearance.
Wrap Up
In summary, attaining a flawless epoxy floor demands thorough planning, diligent surface preparation, and meticulous focus throughout the application procedure. By adhering to these steps and following manufacturer guidelines, you can relish the advantages of a stunning, robust, and enduring epoxy floor in your area. Epoxy flooring not only elevates the visual appeal but also contributes value to your property, all while furnishing a sturdy and low-maintenance surface for the years ahead.